
| 일 | 월 | 화 | 수 | 목 | 금 | 토 |
|---|---|---|---|---|---|---|
| 1 | 2 | 3 | 4 | |||
| 5 | 6 | 7 | 8 | 9 | 10 | 11 |
| 12 | 13 | 14 | 15 | 16 | 17 | 18 |
| 19 | 20 | 21 | 22 | 23 | 24 | 25 |
| 26 | 27 | 28 | 29 | 30 | 31 |
- pandas
- Crawling
- visualizing
- adaptive life cycle
- 자바스크립트
- Project
- DANAWA
- 크롤링
- angular
- data analyze
- tensorflow
- python
- Scrum
- 애자일
- data
- 판다스
- opencv
- webcrawling
- TypeScript
- Agile
- ECS
- 프로젝트
- keras
- javascript
- 다나와
- matplotlib
- Method
- algorithm
- AWS
- analyzing
- Today
- Total
LiJell's 성장기
PyTorch model into web app via SageMaker-1 본문
I had the task of deploying a pre-trained PyTorch neural network via SageMaker, so I want to share how I went through it. I hope this article will make you get familiar with using AWS SageMaker.
Result of Project

You can check the result from Tooning very soon.
*Tooning is a feature that made by *Toonsuqare.
*Toonsquare is a company that actively researches and studies the relationship between AI technology and content.
Communication Flow
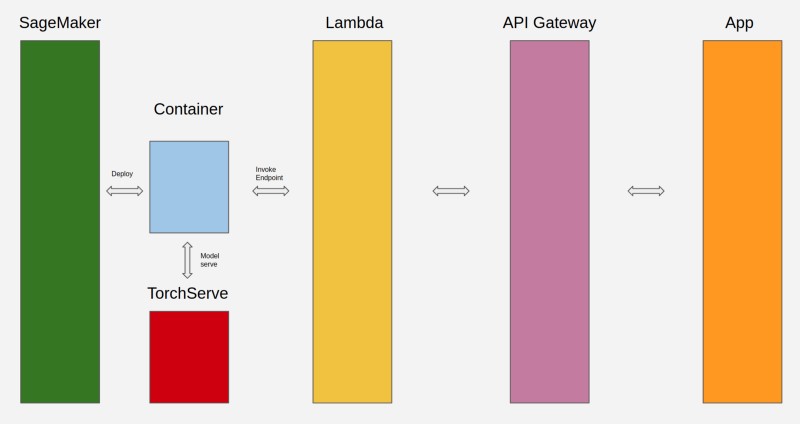
My goal was to access the model via a web application. As you can see in the above figure, I deployed the model by using the *SageMaker Python SDK to make an endpoint, and then a Rest API hosted through API GateWay to access that Lambda function.
*SageMaker Python SDK provides several high-level abstractions for working with Amazon SageMaker.
What is SageMaker
Amazon SageMaker is a fully managed cloud ML platform so that you can easily create, train, and deploy ML models in Cloud. Basically, SageMaker is based on Jupyter Notebook environment, so if you have had an experience with Notebook, you are good to go.
Create SageMaker Instance
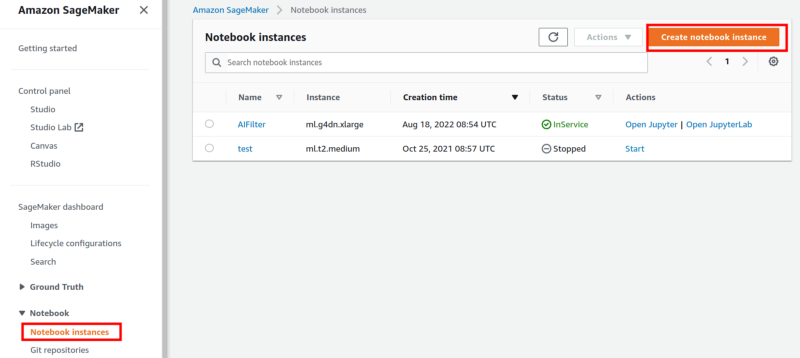
- Enter SageMaker
- Go Notebook => Notebook instances
- Create notebook instance
Depending on instance type, it may cost you a lot.
Please select appropriate instance for your model.
If you need CUDA you need to go with instance that have GPU, or go with regular instance and elastic inference option. I will go with a GPU instance .
Using Models Trained Outside of SageMaker
You can create a PyTorch Endpoint with deploy runs a SageMaker PyTorch model server. The model server loads the model and performs inference on the model in response to SageMaker InvokeEndpoint API calls. Inference will be followed by defined functions in the script.
Prerequisites
Since you are using a model that did not train on Sagemaker, you have to provide an entry point script called inference.py file that can be used on inference.
AWS says Based on the framework — MXNet or PyTorch — the inference script location must conform to the SageMaker Python SDK Model Directory Structure for MxNet or Model Directory Structure for PyTorch.
While on this project, the most challenging part was writing an inference script that is made up of model_fn , input_fn , predict_fn , and output_fn . If your deployed model doesn’t work properly and keeps face “backend dead” logs on CloudWatch, you may have a mistake in writing a script.
1. Model Loading
model_fn loads the model parameters from a model.pth or model.pt file in the SageMaker model directory model_dir . model_dir will be given based on the structure of model.tar.gz .
model_fn should be like the following example below.
import torch
import os

def model_fn(model_dir):
    model = Your_Model()
    with open(os.path.join(model_dir, 'model.pth'), 'rb') as f:
        model.load_state_dict(torch.load(f))
    return model
2. Model Serving
Model serving is the process of responding to inference requests received by calls to the SageMaker InvokeEndpoint API.
- input processing
- prediction
- output processing
According to SageMaker Docs, each step involves invoking a python function, with information about the request and the return value from the previous function in the chain. Inside the SageMaker PyTorch model server, the process looks like:
# Deserialize the Invoke request body into an object we can perform prediction on
input_object = input_fn(request_body, request_content_type)

# Perform prediction on the deserialized object, with the loaded model
prediction = predict_fn(input_object, model)

# Serialize the prediction result into the desired response content type
output = output_fn(prediction, response_content_type)
A — input_fn will deserialize input data into appropriate shape for the model. The following content types are provided as a default implementation by the SageMaker inference toolkit. you should implement the input_fn if your model requires a different content type.
- JSON
- CSV
- Numpy array
- NPZ
B — prediction_fn will return prediction from model. It doesn’t have default implementation
C — output_fn will serialize the data that the preduction_fn returns as a prediction. The following content types are provided as a default implementation by the SageMaker inference toolkit.
- Numpy arrays
- JSON
- CSV
Alternatively, you can define transform_fn to combine input_fn, predict_fn, and output_fn. In my case, it didn’t work on me somehow, so I went through regular way.
3. inference.py of mine
- My model deals with image transition.
- To release instance memory, I used torch.cuda.empty_cache() & gc.collect() . I added those because instance memory kept increasing as much as it worked but never was released.
def model_fn(model_dir):
    """Load the model and return it.
    Providing this function is optional.
    There is a default_model_fn available, which will load the model
    compiled using SageMaker Neo. You can override the default here.
    The model_fn only needs to be defined if your model needs extra
    steps to load, and can otherwise be left undefined.
Keyword arguments:
model_dir -- the directory path where the model artifacts are present
"""
# The compiled model is saved as "model.pt"
model = Generator()with open(os.path.join(model_dir, 'model.pt'), 'rb') as f:
model.load_state_dict(torch.load(f))
model.to(device)
model.eval()
return modeldef input_fn(request_body, request_content_type='application/octet-stream'):
global isPNG
global alpha_value
image = Image.open(BytesIO(request_body))
if image.format == "PNG":
isPNG = True
image = image.convert("RGBA")
np_values = np.array(image)
alpha_value = np_values[:,:,3]
del np_values
else:
alpha_value = 0
isPNG = Falseimage = image.convert("RGB")
image = load_image(image, False)
return imagedef predict_fn(input_data, model):
with torch.no_grad():
image = to_tensor(input_data).unsqueeze(0) * 2 - 1
prediction = model(image.to(device), True).cpu()
torch.cuda.empty_cache()
return predictiondef output_fn(prediction, accept='application/json'):
global isPNG
global alpha_value
prediction = prediction.squeeze(0).clip(-1, 1) * 0.5 + 0.5
prediction = to_pil_image(prediction)
if isPNG:
prediction = prediction.convert("RGBA")
np_prediction = np.array(prediction)
np_prediction[:,:,3] = alpha_value
prediction = Image.fromarray(np_prediction, mode = "RGBA")
del np_prediction
else:
pass
buffer_out = BytesIO()
prediction.save(buffer_out, format="PNG")
output = buffer_out.getvalue()
data = {}
data['img'] = base64.b64encode(output).decode('utf-8')
gc.collect()
return json.dumps(data), acceptIf you done with writing inference.py, you are almost done your work!! Let’s move on :)
Making Endpoint
There is a couple of steps to create an endpoint from your own model. First, you need to make a package the files into a .tar.gz file, and upload the archive to S3.
According to SageMaker Docs, the contents of model.tar.gz should be organized as follows for PyTorch versions 1.2 and higher:
- Model files in the top-level directory
- Inference script (and any other source files) in a directory named code/ (for more about the inference script, see The SageMaker PyTorch Model Server)
- Optional requirements file located at code/requirements.txt (for more about requirements files, see Using third-party libraries)
For example:
model.tar.gz/
|- model.pth
|- code/
  |- inference.py
  |- requirements.txt  # only for versions 1.3.1 and higher
1. Build tar.gz file
Enter command as below on Jupyter Notebook cell.
!tar -czvf model.tar.gz model.pt codeYou will return:
model.pt
code/
code/inference.py
code/.ipynb_checkpoints/
code/model.py
code/requirements.txt
2. import stuffs that you need on further work
%%timeimport os
import boto3
import sagemakerfrom sagemaker import get_execution_roleregion = boto3.Session().region_namerole = get_execution_role()3. tar.gz to s3
To deploy model, tar.gz file need to be located in s3 where default bucket of sagemaker. Bucket created automatically when you create Notebook instance. Following command will send a copy of tar.gz file into s3 bucket.
bucket = sagemaker.Session().default_bucket() !aws s3 cp model.tar.gz s3://$bucket/model.tar.gz4. Packing Model
let’s packing model by using SDK for pytorch!
from sagemaker.pytorch import PyTorchModelmodel_path = 's3://{}/model.tar.gz'.format(bucket)pytorch_model = PyTorchModel(model_data=model_path,
role=role,
entry_point='inference.py',
framework_version="1.9.0",
py_version="py38")What a simple!
You only need to set suitable py_version and framework_version against the model.
5. Deploy model
In this section, you have to clarify serializer and deserializer since we are using SDK 2.X unless you go with default serializer and deserializer. You can attach custom serializer and deserializer as well.
from sagemaker.serializers import IdentitySerializer
from sagemaker.deserializers import JSONDeserializer
predictor = pytorch_model.deploy(
instance_type='ml.g4dn.xlarge',
initial_instance_count=1,
serializer=IdentitySerializer(content_type='application/x-image'),
deserializer=JSONDeserializer()
)It will spend tons of time. Have a break.
6. Prediction via endpoint of deployed model
Finally, it’s time to check your endpoint work properly.
with open('./christmas-4528918_1280.png', mode='rb') as file:
    img = file.read()

result = predictor.predict(img)
What you need to know!
- Instance will possibly cost you a lot.
- You can turn off instance when not using it. It will save your money.
- Our Endpoint offer real-time inference. Serverless inference may good choice depending on usage and frequency unless you need CUDA
- You can turn off your Notebook instance right after deployment. Your Endpoint will work itself.
- Instance type of Real-time inference will be charged the same as instance costs.
- Each Notebook instance can have multiple endpoints. In my case, four endpoints total. ( not sure others are same )
To deploy serverless endpoint
from sagemaker.serverless import ServerlessInferenceConfig# Create an empty ServerlessInferenceConfig object to use default values
serverless_config = ServerlessInferenceConfig()# Deploys the model to a SageMaker serverless endpoint
serverless_predictor = pytorch_model.deploy(serverless_inference_config=serverless_config)Clean up Endpoint
Just in case when you want to delete you endpoint:
predictor.delete_endpoint()Result
This is how you deploy a model on Sagemaker. Next, we will make a connection between Endpoint of model and web app via Lambda and API Gateway.
'Project' 카테고리의 다른 글
| AI 서비스 구현 pjt / Korean Food Classification / INFOODD (0) | 2022.03.31 |
|---|